Showing posts with label cooking. Show all posts

Monday, February 21, 2011

Andama!


For a dinner party last night, I decided to make the last bread that my bread machine ruined: Andama. Judging from the amount of unsolicited compliments it received, it's official: Humans rule, Bread Machines drool.

Andama is a delicious easy way to use up that molasses that's been sitting in your cabinet for ages. This time my recipe came wholesale from McCall's Home Baked Breads, c1965, no changes or additions needed.

McCall's Andama

3/4 c boiling water
1/2 c yellow cornmeal
2 tsp salt
3 tsp butter
1/4 c molasses

First, lightly grease a loaf pan.

In the bowl you plan to be mixing in, mix boiling water, cornmeal, butter, molasses and salt. Stir until all melty and combined. Set aside and allow to cool to lukewarm.

1/4 c warm water (105-115 F)
1 pkg or 2 1/4 tsp yeast

Sprinkle yeast over warm water in a bowl or measuring cup. Stir until dissolved. Add to warm molasses mixture.

1 3/4 c sifted all-purpose flour
1 egg

Add flour and egg to yeasty molasses mix. With a wooden spoon or fancy mixer, stir until smooth.

1 c sifted all-purpose flour

Gradually add the rest of the flour while stirring. Continue mixing until dough is thick enough that it no longer sticks to the sides of the bowl.

Place dough in your pre-greased loaf pan, smoothing with a greased spatula (or your clean hands, like I did) so that it fills the pan evenly with the dough touching the sides of the pan Cover and place somewhere warm, like the oven with the light on.


Forget all about your bread for about 1 hour 30 minutes
(Or until double in bulk)

Sprinkle the top of your bread with salt and cornmeal.

Preheat oven to 375F

Bake 50 to 55 minutes, or until bread is solid enough to rap with your knuckles without giving.

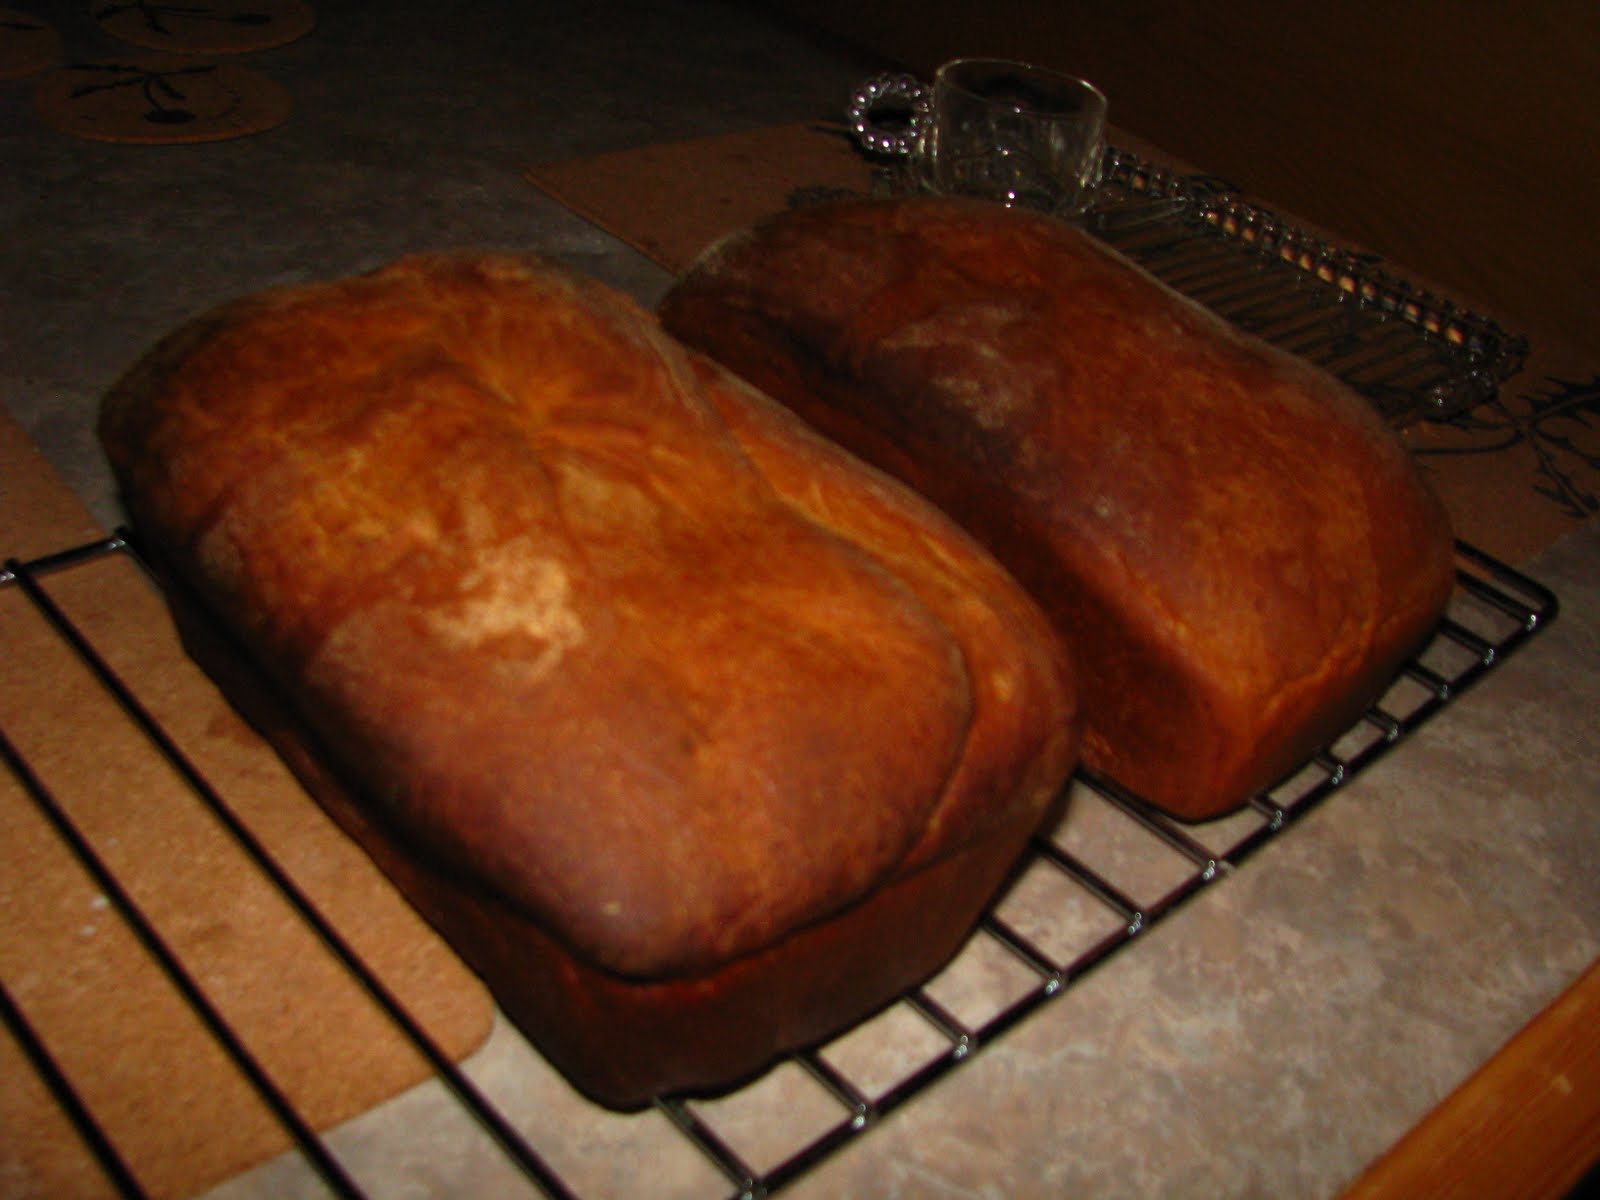
Remove from pans immediately and cool on wire racks. Brush tops with butter (I used olive oil).

Eat as you will!

Friday, February 11, 2011

Nut Teas and Nutella

I've had a pretty bakey week. I didn't make any bread this weekend, because we're still working on that Spiced Honey Wheat Bread (another advantage of making it by hand over using a bread machine : 2 loaves!)

However, I volunteered to host the February board meeting of the Northwest History Network, which meant I had to bake to impress! Or, at least, I wanted to. So I made cookies: LeChuck Chips and Nut Teas. (Every battery in the house was dead, so no pictures. Sorry.)

LeChuck Chips (so named because when I first made them, I was playing a lot of Monkey Island) are basically Chocolate Chip cookies with coconut flakes added, and coconut extract instead of vanilla extract. One could go even further and use coconut oil instead of butter - but I'm much too cheap for that.

I found the recipe for Nut Teas in a cookbook by the Overlook Women's Club from the 1950s - although I can't imagine anyone thinking that "Nut Teas" was a good name for food back then either. The cookbook also didn't think it necessary to give many actual directions beyond a temperature and an ingredient list, but I managed to wing it ok:

Nut Teas
from the Overlook Cookbook ca. 1950
submitted by Mrs. G. A. Baley

1 c firmly packed brown sugar
1 c ground nuts (measure after grinding)
1 unbeaten egg white
pinch salt

Preheat oven to 275F. Mash lumps in brown sugar. Add egg and salt. Add nuts and form into balls. Bake 30 minutes.

What the recipe doesn't tell you is that since these cookies contain no butter and only egg whites, you need to be sure to heavily grease your cookie sheet and be VERY careful removing them after they're done. Make sure to allow them to cool completely on the sheets before chipping them carefully off. Several of mine fell apart because I didn't know this. But they were still delicious, and soon disappeared.

Since I used hazelnuts in the above recipe, and I had a great many of them all ground up and leftover, I decided to attempt to make my own nutella (Recipe found here).

Seen here on my delicious Spiced Honey Wheat Bread (now that batteries have been recharged):


Warning: if you attempt this at home, this recipe is a little too sweet for my taste. I'd recommend using more cocoa powder and less powdered sugar.


Tuesday, February 1, 2011

Spiced Honey Wheat Bread

The second loaf of bread to be destroyed by my bread machine was a Spiced Honey Wheat Bread. On Monday, I recreated it with my own two hands. According to boyfriend, who had a slice for breakfast this morning, the hand-made version was "sofaking good!"

This one was easier to recreate. I just made a basic honey wheat bread and added spicy goodness. I went out for 3 hours during the first rise, and cooked it at the wrong temperature, but even with all those mistakes, it still turned out way better than the Breadman disaster of 2011.

Here's a recipe to try at home!

Sofaking Good Spiced Honey Wheat Bread

1 c milk
2 tbsp sugar
1 tbsp salt
1/4 c butter
1/2 c honey

Heat milk over medium heat until bubbles form at edges. Remove from heat and add the other goodies, stirring until butter is melted and everything else is dissolved. Set aside and allow to cool to lukewarm.

1 1/2 c warm water (105-115 F)
2 pkg or 4 1/2 tsp yeast

Sprinkle yeast over warm water in the bowl you will be using for mixing. Stir until dissolved. Add warm milk mixture.

2 1/2 c sifted all-purpose flour
2 1/2 c unsifted wheat flour
1 tsp cinnamon
1 tsp cardamom
1/4 tsp ground cloves

Add flour and spices to yeasty milky mix. With a wooden spoon or fancy mixer, stir until smooth.

2 1/2 c unsifted wheat flour

Gradually add the rest of the flour while stirring. Continue mixing until dough is thick enough that it no longer sticks to the sides of the bowl.

Turn dough out onto a lightly floured surface. Cover with bowl and walk away for about 10 minutes. Check your email.

When you come back, knead the dough until smooth and elastic (about 10 minutes)

While you were checking your email, you probably should have been greasing a large bowl. Anyway, do that now. Move your finished dough to the buttery bowl, turning the ball over so that all sides get greasy. Cover with a towel and place someplace warm (I like the oven with the light turned on).

Forget all about your bread for about 1 hour 15 minutes.

When you start thinking about your bread again, prepare 2 breadpans, lightly coating them with butter or veggie oil, or your preferred greasy substance. Also flour a surface and your hands, cause you're about to get real familiar with your dough again.

Turn your dough out onto the floured surface and divide in half. Shape into 2 balls. Walk away for 10 minutes again.

When you come back, shape your balls into loaves:

Stretch dough out to approximately 27 inches long.
Fold into thirds, like a letter.
Pinch ends closed and roll into a cylindrical shape.

(Image from McCall's Home Baked Breads, c1965)
Image j is after 2nd rise, so don't worry if your bread doesn't fit its pan like that just yet.


Once you have both loaves in their pans, again, cover with a towel and leave in that warm spot for another hour and 15 minutes.

Preheat oven to 400F

Bake 40 to 50 minutes, or until bread is solid enough to rap with your knuckles without giving. If you want lighter crust (which I recommend) try to remember to cover the loaves with foil for the last 20 minutes of baking.

Remove from pans immediately and cool on wire racks.

Enjoy with tea and jam. Possibly Nutella, if you have some around.

Monday, January 24, 2011

Chocolate Hazelnut Bread


After my failed experiments with my bread machine, I thought I'd attempt to make all the ruined breads the old fashioned way, just to make sure that it really was the bread machine's fault.

Here, you can see the delicious result!


Of course, this time, the white splotches are a dusting of powdered sugar. And the bread rose beautifully. And, because I mixed in the hazelnuts by hand, they are evenly spread throughout this chocolatey sweet bread.


I had to invent a recipe for this one, because bread machine recipes always require weird amounts and not enough yeast. And after having eaten a slice for breakfast, I can confidently say that my recipe tested very well.

Try it yourself!

Sarielle's Chocolate Hazelnut Explosion Bready Cake Goodness

1/2 c milk
1 c white sugar
1 tsp salt
2 tbsp butter

Heat milk in a small saucepan over medium heat until bubbles form at edges. Remove from heat and stir in sugar, salt and butter until dissolved. Set aside and allow to become lukewarm.

1/2 c warm water (105 to 115 degrees Farenheit)
1 packet or 2 1/4 tsp yeast

Sprinkle yeast over warm water in the bowl you will be using for mixing. Stir until dissolved. Add milk mixture.

4 eggs (beaten)
3 1/2 c all-purpose flour (sifted)
1/2 c baking cocoa

Add eggs, cocoa and 1 1/2 c flour to mixture. Stir until smooth. Add remaining flour and again, stir until smooth. Dough will be batter-like.

Cover with a damp towel and place in a warm spot, such as the oven with the light on, and allow to rise until bubbly (about an hour).

1 c toasted, skinned and chopped hazelnuts

If you are starting with whole hazelnuts, because you're cheap like me or you are lucky enough to have your own hazelnut tree, start by measuring out the hazelnuts into a baking pan. Toast in the oven at 350 degrees F for about 15 to 20 minutes. Skins should fall off with only a little encouragement. Put skinned nuts into a food processor and smash!

When dough is ready, stir with a spoon. Add hazelnuts and stir lightly.

Grease a tube pan or bundt pan. If using a bundt pan, be sure to grease every nook and cranny thoroughly, and then lightly flour it. I used butter, but I've read that vegetable oil painted on with a brush works very well.

Pour dough into pan, cover with a damp cloth and put it in that warm spot again for about another hour and a half, until double in bulk.

Preheat oven to 350F

When your dough has filled up its pan nicely, bake 45 minutes. Remove from oven and allow to cool in pan completely on a wire rack.

Carefully remove from pan (you may need to pry gently with a rubber spatula if you used a fancy bundt pan like I did). Dust lightly with powdered sugar, if desired.

Stand back and admire your work. Send a photo to your grandmother.

Eat! Make sure to share, though. It's a lot of bread.


Thursday, November 25, 2010

Instant Thanksgiving Happiness

Happy Thanksgiving!

I woke up early this morning to get us in the spirit for the best holiday of the year.

Before:


After:


On the menu:

Orange Cranberry Sauce
Mashed Punkin/Potatoes
Punkin/Potato/Ginger Soup
Turkey!
Homemade Breads
Apple Onion Dressing
Possibly Spiced Cranberry Cider Wine Punch
and whatever people may bring.

Sunday, September 12, 2010

Rosemary Vinegar: Success


It's as delicious as it looks. Kind of sweet, actually. Which surprised me, but it shouldn't have, because I am a huge fan of the Rosemary Mochas from Pix Patisserie.

(For a few months I was adding rosemary to my coffee every morning, until I switched to cinnamon and nutmeg, until I switched to ginger, until I switched to cardamom, until I switch to roasting my own coffee).

In fact, I threw a splash of this vinegar into my morning coffee. Yum!

I'm sure this vinegar would also be excellent for marinades. I've yet to try making marinades with any of these vinegars, as I don't really cook meat all that much. But eventually I may try marinating some squash or tofu... What else does one marinade?

This was the last vinegar to be made this summer (my vinegar shelf is quite full now). I'm moving on to canning for the next few months (hmm... rosemary vinegar for pickling?).

In the meantime, here's my rosemary vinegar recipe (I don't remember where it came from):

A bunch of rosemary
White vinegar to cover

Wash rosemary and place in a tight-sealing jar. Cover with vinegar. Seal, and let steep in a sunny window for 6 to 8 weeks.

6 to 8 weeks later, strain contents into a saucepan and bring to a simmer (DO NOT BOIL) for 5 to 10 minutes. Allow to cool, then pour into a pretty bottle. If desired, place a sprig of rosemary in the bottle for extra pretty-ness and identification. A label works too.

Since rosemary is pretty much an evergreen (at least up to zone 9, such as Portland) you can gather enough herb to make this vinegar any time of year... although the sunny windowsill might be problematic for cloudier climes.

Tuesday, August 24, 2010

Lavender Vinegar: Success!

Sorry, no photo this time, Boyfriend has taken the digital camera with him on his Fabulous California NINJA tour.

A couple of days ago I decided that my lavender vinegar was ready to be strained and bottled, I didn't get around to testing this light purple concoction until today: YUMS.

If you've ever had anything lavender flavoured and enjoyed it, this is the vinegar for you. It's strongly flavoured (unlike the too-subtle Rose Vinegar), so the tart vinegar flavour takes a backseat to the taste of soothing lavender. I also took a little and mixed it in a bottle with distilled water (approximately 1:8) and put it in the bathroom for use as a toner, so I can be beautiful AND smell great (thus making me even more beautiful).

Lavender grows in great abundance pretty much everywhere. Around Portland, everyone has a bush or two in their yard, so harvesting is a cinch. I recommend using English Lavender for this recipe, as I believe it has the strongest aroma.

Recipe (taken and adapted from Tipnut, a fabulous site):

  • Fill a jar with lavender (both flowers and stems)
  • Pour white vinegar over top, seal jar and refrigerate
  • Shake daily for two weeks
  • Strain the vinegar and use

Next to be ready: Rosemary Vinegar.

I want to try making some mint vinegar too, but I've yet to find any recipes, so I'll have to make one up. However, I'm all out of white vinegar for now. Does anyone know where I can buy white vinegar in bulk (as in, bringing my own bottles)?

Tuesday, August 17, 2010

Rose Vinegar: Slightly Less Sucessful


This morning, I decided that the rose vinegar had been steeping on my windowsill long enough. I strained it and poured it into a fancy looking bottle, mixed a little bit with some water and ice, and gave it a taste.

I think this is a vinegar that needs to be used very sparingly. At first I put a wee splash in the glass, and I thought the flavour was too subtle. So I added a bigger splash, and the flavour gave me a headache.

However, the recipe I used said that rose vinegar can be used for marinades and cold compresses for headaches. Also, I used cheap distilled white vinegar. While the cheap stuff worked fine with the blackberries, the rose flavour isn't strong enough to overwhelm the vinegary-ness. Perhaps if one uses white wine vinegar, the whole thing would turn out much more refined. It's also possible that I used too much vinegar. Further experimentation is merited.

In the meantime, I intend to try making marinades with this batch. I also want to try adding it to hot black tea (when the weather cools down).

Here is the recipe I used, taken from Country Pickles and Preserves (one of the more useful preserving books I've used yet):

The petals of 6 roses (preferably red, cause, pretty)
1 pint white wine vinegar

Pull the petals from the roses and wash them. Snip away the bitter white part at the base of each petal. Put into a glass jar or bottle.

Scald the vinegar by heating it to just below boiling and allow to cool. Add the cooled vinegar to the jar of petals. Cover tightly and place in a sunny window for at least 3 weeks.

Try making your own. Let me know how it turns out!


Friday, August 13, 2010

Blackberry Vinegar: Success!


Yesterday evening, after a long hard day of bowling, I strained, decanted and sampled some of my freshly finished blackberry vinegar while attempting to watch last night's meteor shower.

While the Perseids were a bust, the blackberry vinegar was an explosion of tarty fruity refreshy-ness!

As promised, here is the recipe (taken and altered from Preserving Nature's Bounty.)

A whole bunch of blackberries, washed
Enough apple cider vinegar to cover them all

Place fruit in a non-reactive bowl (I used a ceramic casserole dish) and pour vinegar over them. Crush fruit with a potato masher to release the sweet sweet juices and leave, covered, for 48 hours. Strain through a cheesecloth (though I only have a sieve) and then decant into bottles. Cork and label the bottle. Enjoy!

A note: many recipes I've looked up warn to NOT use apple-cider FLAVOURED vinegar, but to use the real junk made from apples. I didn't realise until after I'd started this process that I have the cheap flavoured variety. While I'm sure my vinegar would have been even more delishuser with real apple cider vinegar, my cheap knock-off store brand didn't ruin anything.

Wednesday, August 11, 2010

New Obsession: Vinegar

So, a few months ago, boyfriend and I went into our favourite local Japanese bar (Miho Izakaya) and the fellow behind the counter said, "We've got some new drinking vinegars right now. Wanna try some?"

My brain said 'wtf? drinking vinegar?' My mouth said, "Hells yea!"

And.

It was delicious.

It was like drinking a cocktail, but slightly tart, and without a buzz. A much less embarrassing non-alcoholic drink to order than a Shirley Temple. In fact, I did some research (being an Information Professional), and it turns out that drinking vinegar cocktails, called Shrubs, was a huge trend among proponents of the Temperance Movement about 100 years ago. I'm against prohibition of any sort, but temperance is something I can get behind.

So, being crafty and thrifty, I've been frantically making tasty vinegars of my own to put into Shrubs using whatever is growing around my neighborhood. So far I have some Rose Vinegar and Rosemary Vinegar steeping in the sunshine on a windowsill, some Lavender Vinegar chilling in my fridge, and some Blackberry Vinegar hanging out in a covered container on my kitchen counter. If any of them turn out well, I'll share a few recipes.

In the meantime, I've been daily enjoying some Coconut Lime Shrubs:

1 pint glass
1/2 ounce Coconut Vinegar
a splash of Lime Juice
3 ice cubes
Fill the rest of the way with distilled water or soda water.

Refreshing!